There are many ways to deal with state in Next.js but I feel there is also a lot of confusion when you have the crossover of server components and client components. Although each scenario is different - I do feel if developers used state in the URL more it would enable a much better user experience.
Table of contents
Open Table of contents
Comparing state
useState & useReducer
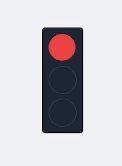
Firstly we have the useState and useReducer hooks, these will be the most useful tools when it comes to managing state especially useState. For any type of complex state useReducer does come handy as an example of this would be a traffic light system - if they want the cars to stop then it would be red only and yellow and green would need to be false. Then if they wanted the drivers to prepare to go then they would need red and yellow to be true and green to still be false. Then lastly once they want the cars to proceed then red and yellow will be false and green will be true.
Redux
Next up we have a popular but outdated state management tool which is redux - this uses useReducer under the hood that uses stores, reducers and actions to enable the developer to effectively manage state. One problem with using this is the fact it takes much longer to setup compared to other options as it uses a lot of boilerplate code.
Zustand
Then my personal favourite zustand which is modern and lightweight and is very user friendly as it doesn’t take too long to setup and also uses the stores pattern which the developer can create as many as they want for specific parts of their application - this means that it won’t render components that don’t use the changed state. This hook mainly relies on using useState and useEffect.
useContext
This hook should be used to state that rarely changes and the reason for that is because it needs to be wrapped around your whole application which means once you changed a value inside useContext your application will need to be re-rendered - therefore this is best used for changing themes or languages. As it’s not a complete state management solution you may also need to use useState or useReducer inside the context as it’s only used for passing values.
Recoil & Jotai
Both of these are modern and lightweight with not too much boilerplate to setup. These are also very similar as they both use atoms which hold individual pieces of state compared to stores which is a container of multiple states. Therefore this makes these both small and fine-grained and would be useful for smaller applications.
React-Query
This is a powerful library for caching and syncing server state. It helps cache data which optimises and improves the web application as it prevents multiple fetches and also has built-in features such as isLoading state and also refetches data which keeps data fresh.
URL params
A great way to store data as it’s easily saved and shared to other users, this is very useful for e-commerce sites as for example if the user has a specific search and wants to save that search then they could save the URL as www.ecommerce.co.uk/products?category=jackets&colour=black&size=m and once accessed this will directly send the user to the specific search. The major difference this type of state management has over the others is the fact it can be used on the server-side in Next.js using the nuqs library.
State options
| Options | Description |
|---|---|
useState & useReducer | Most popular. |
Redux | Complex to setup, uses the reducer pattern. |
Zustand | User friendly, uses stores. |
useContext | Used for rarely changed values. |
Recoil & Jotai | Uses atoms - aimed at small applications. |
React-Query | Caching library that syncs server state. |
URL params | Easily saved and sharable - can be used on the server-side. |
Examples
useState
Firstly for useState we have a simple counter and a person which contains multiple values.
import { useState } from "react";
const [count, setCounter] = useState(0);
const changeNumber = () => {
setCounter(prev => prev + 1);
};
import { useState } from 'react'
type PersonType = {
name: string
age: number
height: number
gender: string
}
const [person, setPerson] = useState<PersonType>({name: "", age: 0, height: 0, gender: ""})
const changePerson = (name: string, age: number, height: number, gender: string) => {
setPerson({name, age, height, gender})
}
useReducer
For the useReducer We will create a traffic light system. We create the function in a seperate component to make the code cleaner and easier to read. We identify the initial state as ‘red’ then we include a switch statement to accurately process each step.
export type LightState = "red" | "red-yellow" | "yellow" | "green";
export const initialState: LightState = "red";
export const trafficLights = (
state: LightState,
action: { type: "NEXT" }
): LightState => {
switch (state) {
case "red":
return "red-yellow";
case "red-yellow":
return "green";
case "green":
return "yellow";
case "yellow":
return "red";
default:
return state;
}
};
We will then import it and use the useEffect hook to demonstrate the process of the lights. We create a setTimeout function to change the lights but if the light includes yellow then it will change in 3 seconds compared to the usual 5 seconds. We then map over the three possible colours and create a simple traffic light system.
"use client";
import { useEffect, useReducer } from "react";
import { initialState, trafficLights } from "./imports";
export default function page() {
const [light, dispatch] = useReducer(trafficLights, initialState);
const colours = ["red", "yellow", "green"];
useEffect(() => {
const time = light.includes("yellow") ? 3000 : 5000;
setTimeout(() => {
dispatch({ type: "NEXT" });
}, time);
}, [light]);
return (
<div className="h-screen flex-center flex-col gap-1">
{colours.map((col: string) => (
<div
key={col}
className={`h-4 w-4 rounded-full border border-gray-300 p-4 ${
light.includes(col) ? `bg-${col}-500` : ""
}`}
></div>
))}
</div>
);
}
The outcome:
Redux
Firstly we will need to install the dependencies, once that is completed we then have to create the slice and store then we need to wrap the provider around the App (react) or Layout (next.js) and then we can change the values in the component.
npm install @reduxjs/toolkit react-redux
// store/slice.ts
import { createSlice, PayloadAction } from '@reduxjs/toolkit';
interface CounterState {
value: number;
}
const initialState: CounterState = {
value: 0,
};
const counterSlice = createSlice({
name: 'counter',
initialState,
reducers: {
increment: (state) => {
state.value += 1;
},
decrement: (state) => {
state.value -= 1;
},
setCounter: (state, action: PayloadAction<number>) => {
state.value = action.payload;
},
},
});
export const { increment, decrement, setCounter } = counterSlice.actions;
export default counterSlice.reducer;
// store/store.ts
import { configureStore } from "@reduxjs/toolkit";
import counterReducer from "./counterSlice";
const store = configureStore({
reducer: {
counter: counterReducer,
},
});
export default store;
React:
// pages/_app.tsx
import { Provider } from 'react-redux';
import store from '../store/store';
function MyApp({ Component, pageProps }: any) {
return (
<Provider store={store}>
<Component {...pageProps} />
</Provider>
);
}
export default MyApp;
Next.js:
// app/layout.tsx
import { Provider } from 'react-redux';
import store from '../store/store';
// Layout component
export default function RootLayout({ children }: { children: React.ReactNode }) {
return (
<Provider store={store}>
<html lang="en">
<body>{children}</body>
</html>
</Provider>
);
}
// pages/index.tsx
import { useDispatch, useSelector } from 'react-redux';
import { increment, decrement, setCounter } from '../store/slice';
const Home = () => {
const dispatch = useDispatch();
const counter = useSelector((state: any) => state.counter.value);
return (
<div>
<h1>Counter: {counter}</h1>
<button onClick={() => dispatch(increment())}>Increment</button>
<button onClick={() => dispatch(decrement())}>Decrement</button>
<button onClick={() => dispatch(setCounter(100))}>Set to 100</button>
</div>
);
};
export default Home;
Zustand
This is fairly easy to setup as you just need to create a store and import it into the component.
import { create } from "zustand";
export type ToastType = {
toastMsg: string;
setToastMsg: (value: string) => void;
};
export const useStoreToastMsg = create<ToastType>((set) => ({
toastMsg: "",
setToastMsg: (tst) => set({ toastMsg: tst }),
}));
const { toastMsg, setToastMsg } = useStoreToastMsg();
useContext
Also fairly easy to setup but should only be used for state that doesn’t change often. We need to create a ThemeProvider then wrap this around your app (react) or layout (next.js)
// ThemeContext.tsx
import { createContext, useState, useContext } from "react";
type ThemeContextType = {
theme: string;
toggleTheme: () => void;
};
const ThemeContext = createContext<ThemeContextType | undefined>(undefined);
export const useTheme = () => {
const context = useContext(ThemeContext);
if (!context) {
throw new Error("useTheme must be used within a ThemeProvider");
}
return context;
};
export const ThemeProvider = ({ children }: { children: React.ReactNode }) => {
const [theme, setTheme] = useState("light");
const toggleTheme = () => {
setTheme((prevTheme) => (prevTheme === "light" ? "dark" : "light"));
};
return (
<ThemeContext.Provider value={{ theme, toggleTheme }}>
{children}
</ThemeContext.Provider>
);
};
// app/layout.tsx (Next.js)
import { ThemeProvider } from "../context/ThemeContext";
export default function RootLayout({ children }: { children: React.ReactNode }) {
return (
<ThemeProvider>
<html lang="en">
<body>{children}</body>
</html>
</ThemeProvider>
);
}
// components/ThemeToggle.tsx
import { useTheme } from "../context/ThemeContext";
export default function ThemeToggle() {
const { theme, toggleTheme } = useTheme();
return (
<button
onClick={toggleTheme}
className="rounded border p-2"
style={{
background: theme === "light" ? "#fff" : "#333",
color: theme === "light" ? "#000" : "#fff",
}}
>
Toggle Theme (Current: {theme})
</button>
);
}
Recoil & Jotai
Both of these use atoms for state and the boilerplate to setup is similar to each other.
npm install recoil
// app/layout.tsx
"use client";
import { RecoilRoot } from "recoil";
export default function RootLayout({ children }: { children: React.ReactNode }) {
return (
<RecoilRoot>
<html lang="en">
<body>{children}</body>
</html>
</RecoilRoot>
);
}
// state/counterAtom.ts
import { atom } from "recoil";
export const counterAtom = atom({
key: "counter",
default: 0, // Initial state
});
// components/RecoilCounter.tsx
"use client"; // Required for Next.js App Router
import { useRecoilState } from "recoil";
import { counterAtom } from "../state/counterAtom";
export default function RecoilCounter() {
const [count, setCount] = useRecoilState(counterAtom);
return (
<div className="text-center">
<h2>Recoil Counter: {count}</h2>
<button
onClick={() => setCount(count + 1)}
className="rounded bg-blue-500 p-2 text-white"
>
+
</button>
<button
onClick={() => setCount(count - 1)}
className="rounded bg-red-500 p-2 text-white"
>
-
</button>
</div>
);
}
React-Query
We will need to create a simple fetch function and we will pass this into a query using a custom hook. If a user was to navigate someone else on the web application with this query then it will be cached and wouldn’t need to be reloaded.
export const getPostsByUser = async (userId: string | undefined) => {
const res = await fetch(`${endpoint}/posts/${userId}`)
return res.json()
}
export const useGetPostsByUser = (user_id: string | undefined) => {
const { data: posts, isLoading } = useQuery({
queryKey: ["posts", user_id],
queryFn: () => getPostsByUser(user_id),
});
return { posts, isLoading };
};
const { posts, isLoading } = useGetPostsByUser(userId);
{posts?.map((post: PostType) => (
<div>
<p>{post.name}</p>
<p>{post.description}</p>
<p>{post.category}</p>
</div>
))}
URL params
We will be using useRouter for this example, however in the next post we will look deeper into better and cleaner approaches which also allow us to use it server-side.
// app/shop/page.tsx
"use client";
import { useSearchParams, useRouter } from "next/navigation";
export default function ShopPage() {
const searchParams = useSearchParams();
const router = useRouter();
const category = searchParams.get("category") || "all";
const color = searchParams.get("color") || "any";
const size = searchParams.get("size") || "any";
const updateFilter = (key: string, value: string) => {
const params = new URLSearchParams(searchParams.toString());
if (value === "any") {
params.delete(key);
} else {
params.set(key, value);
}
router.push(`/shop?${params.toString()}`);
};
return (
<div className="p-4">
<h1 className="text-xl font-bold">Shop Jackets</h1>
<div className="flex gap-4 mt-4">
<label>Color:</label>
<select value={color} onChange={(e) => updateFilter("color", e.target.value)}>
<option value="any">Any</option>
<option value="black">Black</option>
<option value="blue">Blue</option>
<option value="red">Red</option>
</select>
<label>Size:</label>
<select value={size} onChange={(e) => updateFilter("size", e.target.value)}>
<option value="any">Any</option>
<option value="s">S</option>
<option value="m">M</option>
<option value="l">L</option>
</select>
</div>
<p className="mt-4">Selected: {category} | {color} | {size}</p>
</div>
);
}
Conclusion
This is a brief introduction into each state management patterns which hopefully help developers decide which is better for each use-case. My next post will look into URL params deeper and use one of my favourite packages nuqs which allow us to use state management server-side.